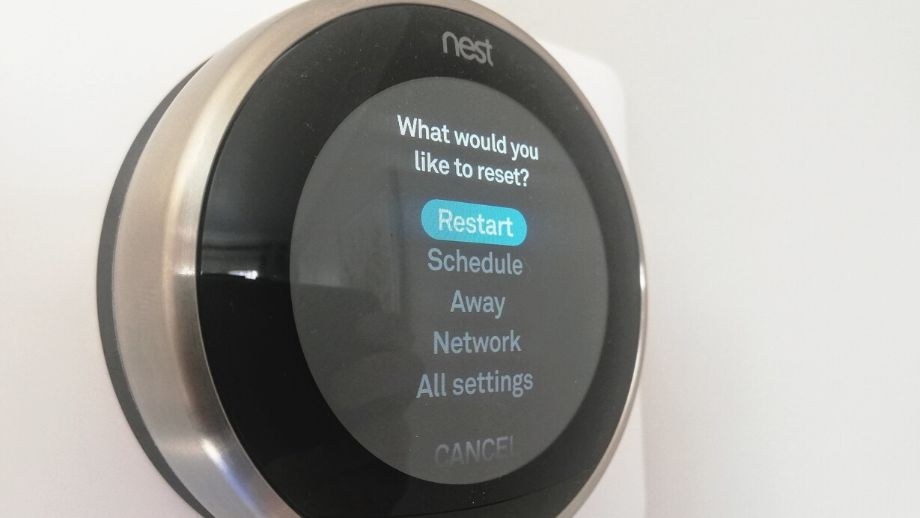
A restart is the first step for common Nest thermostat problems such as a frozen screen, dropped WiFi or settings that do not stay saved. Like rebooting a computer, it clears temporary state without deleting your schedule. A reset removes selected information—or everything—and is a bigger step when restarting is not enough, you are changing HVAC equipment, or you plan to sell the thermostat.
Try a restart first
If the display is blank rather than frozen, troubleshoot power problems before attempting a restart.
- Hold the thermostat ring for about 10 seconds, until the screen turns completely off.
- Let go, then press the ring again to start the restart.
- Wait until the display has fully turned on.
You can also access the on-device menu by pressing the ring, then choosing Settings, Reset, and Restart or Factory Reset. The on-device reset does not require a phone or app.
Before resetting
Nest offers Schedule Reset, Wi-Fi Reset, Away Reset, and Factory Reset (All Settings). Choose the targeted option when you do not need to erase everything.
Record your schedules, custom settings and hardware details first, including wire configuration, HVAC equipment and temperature settings. Hardware information is under Settings in the “Equipment” menu. SmartHomePerfected advises against attempting work beyond your competence; seek professional help if unsure.
Clear the schedule
All Nest Thermostats, including the 3rd Gen and Nest E, allow personalized heating and cooling schedules. A Schedule Reset removes learned and manually entered temperature set points so you can build a new routine.
- Press the ring to open the main menu.
- Turn it to ‘Settings' and press to select.
- Scroll to ‘Reset' and press the ring.
- Select ‘Schedule' by pressing the ring.
- Choose ‘Reset' or ‘Clear', depending on the model.
- Follow the confirmation instructions. These typically involve turning the ring half a turn or waiting for a timer.
- Allow the thermostat to reset the schedule and reboot.
The schedule will be empty after the restart.
Reset the Wi-Fi connection
A Wi-Fi reset deletes the current network configuration, preparing the thermostat for a different network. It may help after changing routers or when a power outage or connection failure leaves Wi-Fi unreliable.
- Press the Nest ring button to wake the display and open the quick-view menu.
- Go to Settings.
- Select Reset.
- Choose “Network”.
- Press Reset or Clear.
- Follow the confirmation instructions.
- Wait for the reset and reboot to finish.
Connect to the new Wi-Fi network through Settings → Network.
Reset Away settings
An “Away” Reset removes settings and temperature configurations for home versus away and home/away assist modes.
- Wake the display and open the quick-view menu.
- Go to Settings.
- Select “Reset”.
- Choose “Away”.
- Press Reset or Clear.
- Complete the confirmation prompts.
Perform a factory reset
A hard or factory reset restores defaults and erases stored settings, including the schedule, WiFi and account link. It can clear persistent software glitches, but requires setup afterward. The source recommends it before selling the thermostat or moving out to remove personal information.
Before proceeding, record custom settings and remove the thermostat from your Nest account:
- Open the Nest App.
- Tap the Menu icon at the upper left.
- Choose the home connected to the thermostat.
- Select the thermostat on the app’s home screen.
- Tap the Settings icon at the upper right.
- Scroll down and tap “Remove.”
- Follow any prompts to confirm.
Once the device is removed from the account, continue on the thermostat:
- Press the ring button to wake the screen and open the quick-view Menu.
- Tap the settings icon.
- Select ‘Reset'.
- Choose ‘All Settings'.
- Turn the ring as instructed to confirm.
The thermostat will reset and reboot, after which you can configure it again. Re-add it in the Google Home app; the source also notes access from a computer through Google Home app on PC.
The source additionally advises removing the thermostat from the Nest or Google Home app after a factory reset and before re-adding it. An old account link may otherwise prevent reconnection.
If replacement makes more sense
For recurring problems or a thermostat beyond repair, the source’s smart thermostat guide lists Honeywell Home X8S for room sensors and HomeKit, and Amazon Smart Thermostat as its budget choice for Amazon households.
Its upgrade suggestions also include Google Nest Learning Thermostat as the most popular option, Honeywell Home X8S Smart Thermostat, and Honeywell Home T6 Pro Smart Thermostat as the best-value choice. The source presents these app-controlled, remotely accessible models as reliable, easy DIY replacements.
Related buying guides cover remote sensors, humidity control, mini split systems, HomeKit and battery backup. The publisher discloses commissions on purchases through its links at no extra cost, including qualifying purchases as an Amazon Associate.

